
How to Banish Paint Swirl Removal Mistakes for Good
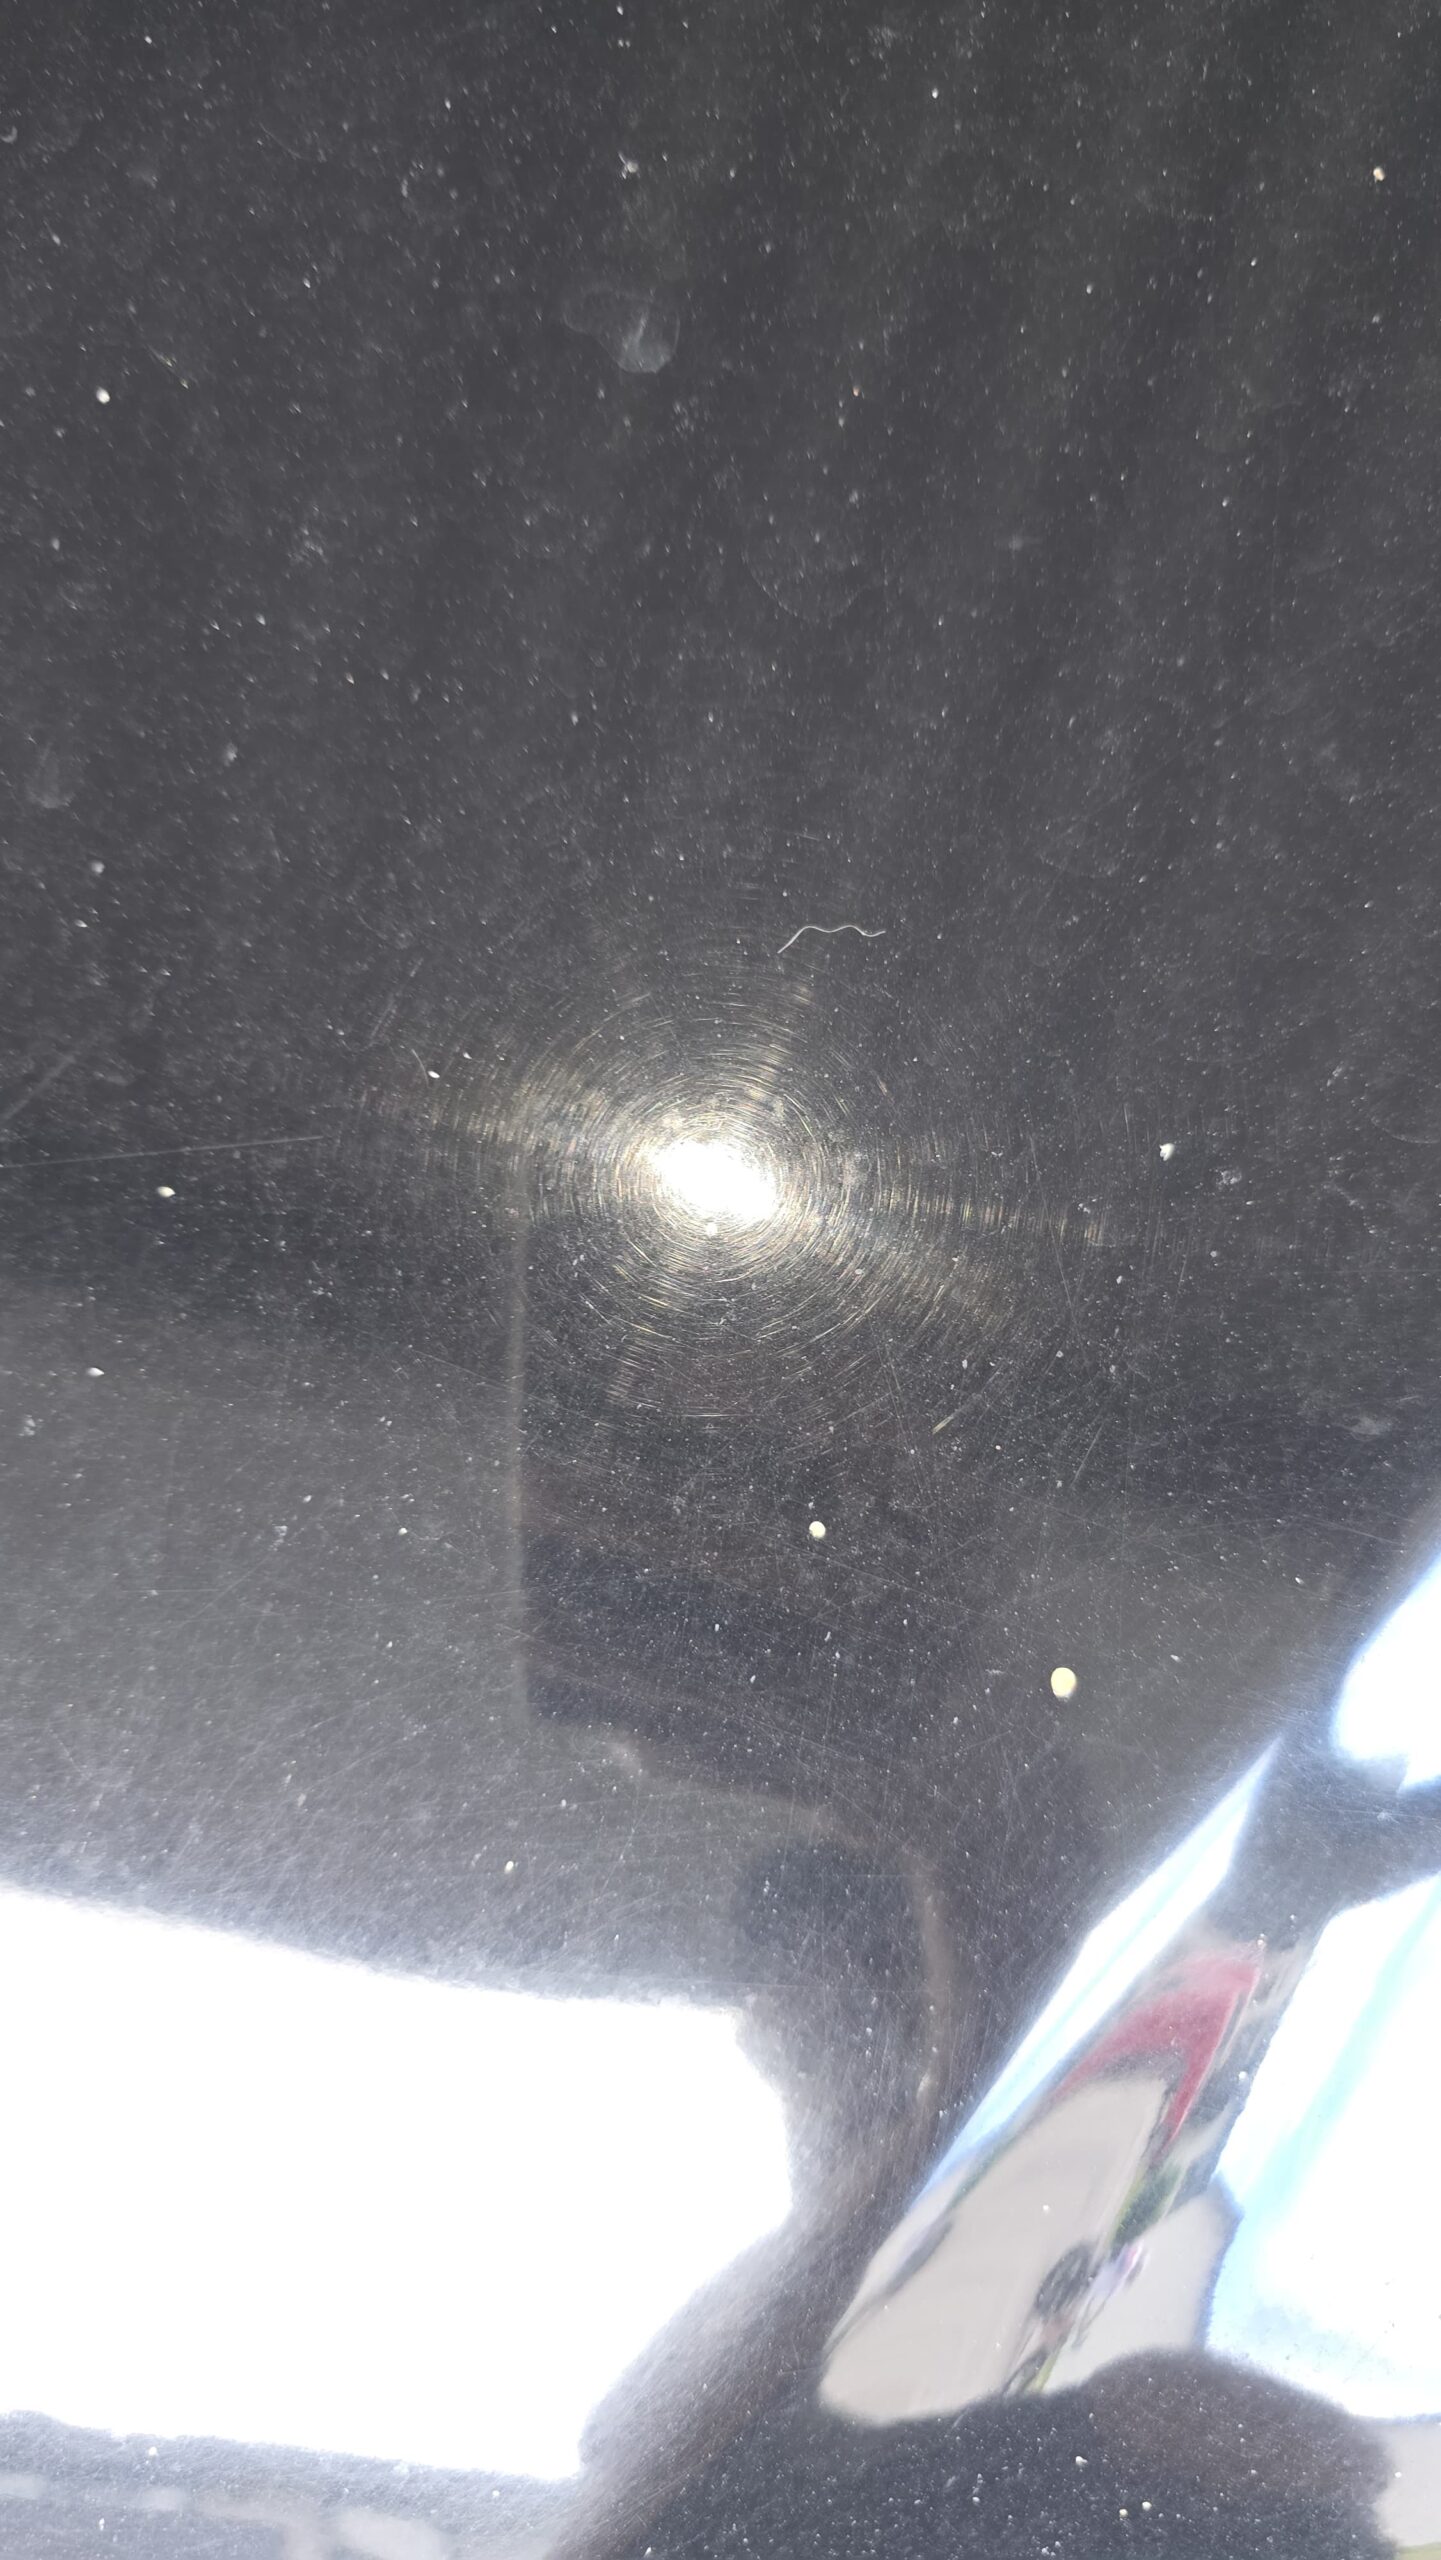
There is a moment every car owner knows well. You finish washing your vehicle, step back in the sunshine, and notice it, that cobweb of fine circular scratches across the bonnet and roof, making the paint look dull and hazy despite the fact you just cleaned it. Over 95% of swirls and scratches come from improper car washing techniques, including using the wrong wash method, one bucket, not using enough soap, or using old rags and towels to dry. For Colorado drivers in particular, this pain is even more acute, Colorado’s high altitude means UV exposure is roughly 25% more intense than at sea level, and dramatic temperature swings of 40 degrees or more in a single day compound exterior damage that many drivers simply do not anticipate. The good news is that most paint swirl removal mistakes are completely avoidable once you know what you are doing. This guide is here to help.
I’ve spent years advising vehicle owners on how to protect their investment, and the single most common regret I hear is, “I wish someone had told me this sooner.” Whether your car already has swirl marks or you want to prevent them from forming in the first place, what follows is a practical, honest walkthrough of everything that matters.
Key Takeaways
-
Swirls start during washing, not driving: The most common cause of swirl marks is improper care and washing of the vehicle’s painted surfaces. Changing your wash technique is the single most impactful step you can take.
-
The two-bucket method is non-negotiable: The trick to scratch and swirl-free paint is to use two buckets when washing your car, a good quality mitt, premium towels, and a dirt trap bucket filter. Make this a habit and you will eliminate the majority of self-inflicted paint damage.
-
Swirls cost real money at resale: Studies show poor paint condition can reduce resale value by 5-15%, on a $30,000 car, that is $1,500-$4,500 lost. Therefore, protecting your paint is a financial decision, not just an aesthetic one.
-
Ceramic coating helps, but it cannot fix existing swirls: Ceramic coatings do not fill swirl marks, scratches, or paint defects. Any visible improvement in gloss comes from optical enhancement and surface protection, not from defect correction. Correct first, then protect.
-
Colorado’s climate makes protection urgent: Colorado’s elevation intensifies UV exposure, meaning paint fade, clear coat breakdown, and plastic trim deterioration happen faster here than in many other states. Delaying protection costs more in the long run.
Quick-Start Prioritisation Framework
| Strategy | Best For | Effort Level | Time to Results |
|---|---|---|---|
| Two-bucket wash method | All vehicle owners | Low | Immediate |
| Microfiber upgrade (mitts and towels) | DIY home washers | Low | Immediate |
| Hand polishing with swirl remover | Light swirls on small areas | Medium | 1-2 hours |
| Dual-action machine polisher | Moderate swirling across panels | Medium | Half day |
| Professional single-stage correction | Heavy or widespread swirling | Low (outsourced) | Same day |
| Ceramic coating (post-correction) | All vehicles wanting long-term protection | Low (outsourced) | 1-2 days cure |
Start here if you are:
-
A home car washer with mild swirling: Switch to the two-bucket method and a quality microfiber mitt immediately, lowest cost, highest prevention impact.
-
Dealing with visible swirls across multiple panels: Book a professional single-stage paint correction. Professional single-stage correction typically starts at $150 to $300 per vehicle for a DIY setup, or more through a shop.
-
Thinking long-term about paint health: Combine professional correction with a ceramic coating. Ceramic coating helps reduce the chances of swirl marks forming by making the surface slicker, which means less friction during washing and drying.
Why Swirl Marks Form in the First Place
Before you can fix anything, it helps to understand exactly what you are dealing with.
The Science Behind the Scratch
Car paint swirls are circular microscopic imperfections on a vehicle’s surface. Looking closely at a dark-coloured car on a sunny day reveals the shimmering circular pattern of tiny reflective scratches. They live in the clear coat, the outermost protective layer over your colour coat, and swirl marks are usually no more than 2-4 microns deep, so they do not go deeper than the surface of the clear coat of paint. That is actually encouraging news: if they are still in the clear coat, they can be corrected.
Most paint damage happens during routine care, not from driving. Understanding the mechanics behind swirl marks on car surfaces helps you spot bad habits before they compound. Think about that for a moment. The very act of washing and drying your car, something you do to protect it, may actually be the source of the problem.
The Biggest Culprits
The major factors that can contribute to swirl marks while washing are: improper rinsing (not rinsing completely before washing), no or not enough lubrication from soap or other cleaning chemicals, and wrong washing tools such as stiff brushes and hard sponges. I’ve also seen people make the mistake of wiping a dusty car with a dry cloth out of convenience, which is one of the fastest ways to scratch clear coat.
A wash mitt that does not hold water or dirt well tends to press the dirt against the paint and not give enough lubricity for the cleaning process, resulting in light swirl marks. Grit guards, contaminated mitts, and circular scrubbing motions are all compounding offenders. In Colorado specifically, the semi-arid climate means dust and dirt particles are always swirling around, settling on your vehicle and grinding into the finish every time you wipe it down incorrectly.
The Right Wash Technique Stops Most Swirl Marks at the Source
If you only take one thing from this article, make it this section.
The Two-Bucket Method Explained
This proven wash technique helps reduce the risk of swirls and scratches during a car wash by keeping dirt and contaminants out of your wash mitt and off the paintwork. The setup is simple: one bucket holds your soapy wash solution, and a second bucket holds clean water for rinsing your mitt between panels. A grit guard sits at the bottom of each bucket to trap debris so it cannot migrate back onto your paint.
Dip your wash mitt in the cleaning bucket and wash one section of the car at a time, panel by panel from top to bottom. Then put the mitt in your rinse bucket to remove dirt particles. Repeat. It feels slower at first, but once it becomes habit, it adds almost no extra time. The Chemical Guys two-bucket wash guide is a brilliant free resource for getting the steps exactly right.
Pro tip: Always wash in straight lines, never circles. Circular rubbing during drying reintroduces the swirl risk that the wash was designed to prevent. Straight-line passes, both during washing and drying, are the standard in professional detailing.
The Drying Step People Always Get Wrong
A safe wash can still end badly if the drying step is careless. People undo their own work; they grab an old bath towel, a worn chamois, or whatever fabric is close, then wipe hard to chase every drop. If any leftover grit remains on the surface or in the towel, the drying phase becomes another contact-based scratch session.
The fix is straightforward. Use large, clean microfiber drying towels designed for paintwork. Plush microfiber gives you a softer contact surface and better absorption, which means less pressure on the paint. Replace your drying towels regularly and wash them in a gentle, fragrance-free detergent with no fabric softener, which clogs microfibre fibres and makes them more abrasive.

Paint Swirl Removal, What Actually Works
Once swirl marks are present, prevention alone will not help. You need to address what is already there.
Assessing the Depth of the Damage
Before reaching for any product, take a moment to inspect the paint properly. Running fingernails lightly across suspected scratches reveals depth through feel. Surface swirls feel smooth with no catch. Deeper defects create a noticeable edge that your nail drops into. If your nail catches, the scratch likely penetrates beyond the clear coat and may need professional attention or touch-up paint rather than polishing.
Paint meters measure remaining clear coat depth before polishing begins. A thin clear coat limits how aggressively you can correct. In my experience, this step is almost always skipped by DIY detailers, and it can lead to expensive mistakes, particularly on dark-coloured vehicles where the clear coat is often softer and thinner.
Hand Polishing for Light Swirls
For minor swirls, a high-quality polish and microfiber applicator pad can help smooth out imperfections. This method is ideal for those who prefer DIY solutions but still want professional-quality results. Apply a small amount of swirl-remover compound to a foam applicator pad and work in overlapping straight-line passes, section by section. Buff off the residue with a clean microfiber cloth.
This approach suits small areas and light damage. For anything more widespread, you will want a machine.
Machine Polishing: Choosing the Right Tool
A dual action polisher swings in a rotating and oscillating pattern. It is gentler and more forgiving, ideal for beginners or routine maintenance. For most home car owners tackling swirl removal for the first time, a dual-action (DA) polisher is the right call. As a general rule, a dual-action polisher (not a rotary) will always be the best for beginners, because they can remove scratches without creating a ton of heat. DAs are less likely to leave behind holograms or buffer trails compared to rotaries.
One mistake I’ve seen people make is to use too much downward pressure on the polisher. For the best correction results, the polisher must be spinning freely on the paint, so only very little pressure is needed. Let the machine and the compound do the work. If you find yourself leaning hard on the polisher, you are likely causing more harm than good.
The Auto Finesse swirl mark removal guide is a solid reference for understanding polishing pads and compound grades, and the YouTube channel at Shah Nul Islam’s detailing videos offers visual demonstrations of machine polishing technique that make the process much easier to follow.
Pro tip: Work in a shaded area or indoors. swirl marks are usually no more in shady areas or if the car is wet, which means shaded conditions also let you inspect your work accurately as you go. Working in direct sun dries product too quickly and makes it harder to assess correction progress.
This walkthrough demonstrates the full polishing process in a home setting, showing how to use a machine polisher to lift swirl marks from the paint.
What Comes After Correction, Locking In Your Results
Removing swirls is only half the job. Unprotected, freshly corrected paint will pick up new swirls within weeks if you revert to old habits.
Sealants and Waxes as a First Line of Defence
Applying sealant immediately after correction creates a sacrificial barrier that prevents new swirl marks from forming on bare paint. A quality paint sealant or carnauba wax adds a layer of protection that takes the initial abrasive contact during the next wash, rather than your clear coat. Having wax applied to the exterior adds an extra layer that helps protect the paint further and can also keep the car from getting too dirty to begin with, which reduces how hard you have to work during every subsequent wash.
Ceramic Coatings for Lasting Protection
For Colorado drivers dealing with intense UV, road salt, sudden hailstorms, and wildfire smoke particulates, a ceramic coating deserves serious consideration. Ceramic coating is a liquid polymer that bonds chemically with your car’s factory paint, creating a durable, hydrophobic layer of protection. Unlike wax or temporary sealants, a high-quality ceramic coating can last for years and significantly reduce the risk of paint damage from swirl marks, UV rays, salt, and contaminants.
However, there is one critical thing to understand before booking a coating. Ceramic coatings are designed to protect your car’s paint, not to correct existing imperfections. While ceramic coatings will not hide existing swirl marks, they can enhance the overall appearance of your vehicle and help prevent new swirls from forming. For the best results, start with a swirl-free surface and then apply your ceramic coating for long-lasting protection and shine.
The team at FB Mobile Auto Detailing takes care of both steps, paint correction followed by ceramic coating, so that you are not sealing in defects and wasting money on a coating that simply amplifies what is already wrong with the paint.
Pro tip: Colorado car experts often recommend polymer sealants or ceramic coatings for vehicles frequently exposed to sunlight. If your vehicle spends most of its time outside and you are not in a position to garage it, the cost of a ceramic coating becomes a much easier calculation when you factor in the protection it provides over several years.
Common Swirl Removal Mistakes That Set You Back
Understanding what not to do is just as valuable as knowing the correct steps.
Skipping the Decontamination Stage
Before you go anywhere near your car’s paint with a polisher, you need to make sure the surface of the car is completely free of any contaminants such as tar or road grime. Polishing over bonded contamination is like sanding over gravel; you are pushing abrasive material directly into the clear coat. A proper wash, followed by a clay bar treatment on contaminated panels, needs to happen before any correction work begins.
Using the Wrong Polisher for Your Skill Level
Rotary polishers can easily cause swirl marks or holograms, and improper use leads to paint thinning or burning through clear coat layers. In my experience, a rotary polisher in untrained hands can do more damage to a car in 20 minutes than years of improper washing. Stick to a dual-action polisher until you are fully comfortable with pad selection, compound choice, and machine speed.
Applying Ceramic Coating Over Uncorrected Paint
Ceramic coating highlights scratches and swirl marks after it hardens and cures. The property that improves your vehicle’s paint gloss and shine also enhances imperfections. This is one of the most costly mistakes I see. People invest hundreds of dollars in a ceramic coating, only to find that their existing swirl marks are now amplified rather than hidden. Always correct the paint first.
Ignoring the Financial Consequence
Excessive swirl marks hurt the resale value of vehicles by making the paint look worn and uncared for. Buyers may offer less for a vehicle with swirl-marked paint that appears neglected. According to Edmunds’ vehicle condition ratings, paint gloss and the presence of scratches are factored directly into pricing tiers, meaning visibly swirled, oxidised, or hazy paint signals neglect and invites negotiation downward. Corrected paint supports a stronger asking price, and the investment in correction before a sale frequently returns more than the cost of the correction in the final transaction.
Understanding Professional Paint Correction Costs
If swirling is widespread or you simply do not want to tackle the job yourself, professional correction is well worth the investment.
What to Expect to Pay
The average cost ranges from $400-$1,200, depending on vehicle size, paint condition, and service level (1-3 stages). Paint correction removes defects like swirl marks, oxidation, scratches, and water spots to restore gloss and clarity. A 1-stage correction removes up to 65% of defects; a 3-stage correction refinishes up to 95% of the surface.
According to Experience Detailing’s 2025 price guide, expect to pay $500 to $800 for most vehicles for a standard single-stage correction, which includes polishing to remove light swirls and boost gloss. Multi-stage correction for heavier damage runs higher, and that cost is worth it when you consider what poor paint condition does to resale value.
The Ride and Shine paint correction guide notes that a professional paint correction can boost your car’s value by hundreds or even thousands of dollars, and also prepares your car for protective coatings like ceramic coatings or paint protection film. Frame it that way and the maths often works in your favour.
Frequently Asked Questions
What exactly are swirl marks, and are they permanent?
Swirl marks are fine micro-scratches in your car’s clear coat, usually caused by improper washing or drying. They show up clearly in direct sunlight and make the paint look hazy or dull. The good news is that most swirl marks are entirely correctable through machine polishing, provided the scratches remain within the clear coat layer. Only if they penetrate through to the base coat would you need more significant intervention.
Can I remove swirl marks by hand without a machine?
Yes, for light, localised swirling. For minor swirls, a high-quality polish and microfiber applicator pad can help smooth out imperfections. However, hand polishing has limits; it is time-consuming, less consistent than machine work, and will not address heavier or more widespread swirling effectively. For anything beyond a small section, a dual-action polisher delivers far superior results in much less time.
Will a ceramic coating hide my existing swirl marks?
Ceramic coatings do not hide swirl marks. They may slightly increase gloss, but the defects remain visible unless polished out beforehand. In fact, the enhanced reflectivity of a coating can make swirls more noticeable, not less. Always carry out paint correction before applying any protective coating for the best outcome.
How much does professional swirl removal cost in Colorado?
Professional paint correction typically ranges from $400 to $1,200 or more, depending on the size of the vehicle and the severity of the damage, as noted in 5 Diamond Detailing’s pricing breakdown. Single-stage correction handles light to moderate swirling and is the most common starting point. Multi-stage correction for heavily damaged paint runs higher. Given Colorado’s intense UV environment, pairing correction with a ceramic coating is a particularly sound investment for vehicles kept outdoors.
How can I prevent swirl marks from coming back after correction?
A wash mitt that does not hold with the tools, products, and techniques you use for washing is mandatory to keep your vehicle swirl-free for as long as possible. Specifically: adopt the two-bucket wash method, use a quality microfiber mitt, dry with a plush microfiber towel in straight-line passes, and apply a paint sealant or ceramic coating after correction. Never wipe a dry, dusty car. These habits, maintained consistently, will dramatically extend the time before your paint needs correcting again.
Final Thought
Paint swirl removal is one of those topics that seems complicated until you break it down. The causes are predictable, the solutions are proven, and the financial case for taking care of your paint is rock-solid. If your vehicle has seen one too many incorrect washes or the harsh Colorado sun has taken its toll, I’d encourage you to start with the simplest fix, changing how you wash, and work from there. When you are ready for correction or a ceramic coating, the professionals at FB Mobile Auto Detailing bring everything to you, saving you time while delivering results that last.
Sources
-
How To Remove Swirl Marks On Car Paint Permanently, Chemical Guys. Causes, assessment, and correction techniques. https://www.chemicalguys.com/blogs/exterior-how-tos/swirl-marks-on-car
-
Two Bucket Method Car Wash Guide, Chemical Guys. Step-by-step swirl-free washing technique. https://www.chemicalguys.com/blogs/exterior-how-tos/two-bucket-method-car-wash
-
What is the Scratch Free Wash Method?, Chemical Guys. Statistics on swirl causes from washing. https://www.chemicalguys.com/blogs/exterior-how-tos/what-is-the-scratch-free-wash-method-and-should-i-use-it
-
Paint Correction Cost And What To Expect, Chemical Guys. DIY and professional pricing guide. https://www.chemicalguys.com/blogs/exterior-how-tos/paint-correction-cost
-
How to Remove Swirl Marks from Car Paint, Auto Finesse. Detailing guide and polishing products overview. https://www.autofinesse.com/blogs/car-detailing-guides/how-to-remove-swirl-marks-from-paint
-
How Much Does Paint Correction Cost In 2025?, Experience Detailing. Full price guide and service breakdowns. https://www.experiencedetailing.com/how-much-does-paint-correction-cost/
-
Paint Correction Cost Complete Guide 2026, Ride and Shine Detail. Swirl removal pricing and resale value impact. https://rideshinedetail.com/how-much-does-paint-correction-cost/
-
How Much Does Paint Correction Cost? Latest Update, 5 Diamond Detailing. Stage-by-stage pricing and defect percentages. https://www.5diamonddetailing.com/how-much-does-paint-correction-cost
-
Can Ceramic Coating Prevent Swirl Marks?, Wax Masters Detailing. Ceramic coating and swirl mark prevention. https://waxmastersdetailing.com/can-ceramic-coating-prevent-swirl-marks-on-your-car/
-
Does Ceramic Coating Fill Swirls? Truth Explained, Carolina’s Finest Detailing. Debunking ceramic coating myths. https://carolinasfinestdetailing.com/detailing-debunked-does-a-ceramic-coating-fill-in-swirls/
-
Top 5 Most Asked Questions About Ceramic Coatings, Wax is Dead. Coating expectations and swirl visibility. https://waxisdead.com/top-5-most-asked-questions-when-it-comes-to-ceramic-coatings/
-
Colorado Weather vs. Your Car, Elevated Auto Body. Colorado UV and clear coat effects. https://elevated-autobody.com/auto-body-insights-and-tips-blog/colorado-weather-vs-your-car-how-to-protect-your-vehicle-year-round
-
Colorado Weather and Car Wash Protection Tips, Rocket Express Car Wash. Colorado altitude UV data. https://www.rocketexpresscarwash.com/colorado-weather-car-wash-protection-tips/
-
How Colorado’s Climate Impacts Auto Paint, Yoder Collision Network. Colorado-specific paint protection advice. https://yodercollisionnetwork.com/auto-body-repair/how-colorados-climate-and-weather-impact-auto-paint-signs-and-repairs/
-
The Hidden Cost of Swirl Marks, Sparkle NC. Resale value reduction statistics. https://www.sparklenc.com/blog/swirl-marks-paint-correction-cost-greensboro-nc
-
Beginners Car Polishing Guide, Drive Detailed. Polishing technique and machine pressure tips. https://drivedetailed.com/beginners-car-polishing-guide-how-to-remove-swirl-marks/
-
Dual Action vs Rotary Polisher, Slick Motorz. Tool comparison for swirl correction. Rotary polishers can easily cause
-
What Causes Swirl Marks?, Detailed Image Ask a Pro. Wash mitt contamination and swirl formation. A wash mitt that does not hold
-
Edmunds Vehicle Condition Ratings, Edmunds. Paint condition impact on vehicle pricing. Edmunds’ vehicle condition ratings
-
What Causes Paint Swirl Marks?, Onsite Detail. Washing factors and prevention. https://onsitedetail.net/blog/what-causes-paint-swirl-marks/


